New Enclosure Build concept to completion

Status
Not open for further replies.

kingofnobbys

BD.org Sicko
Original Poster
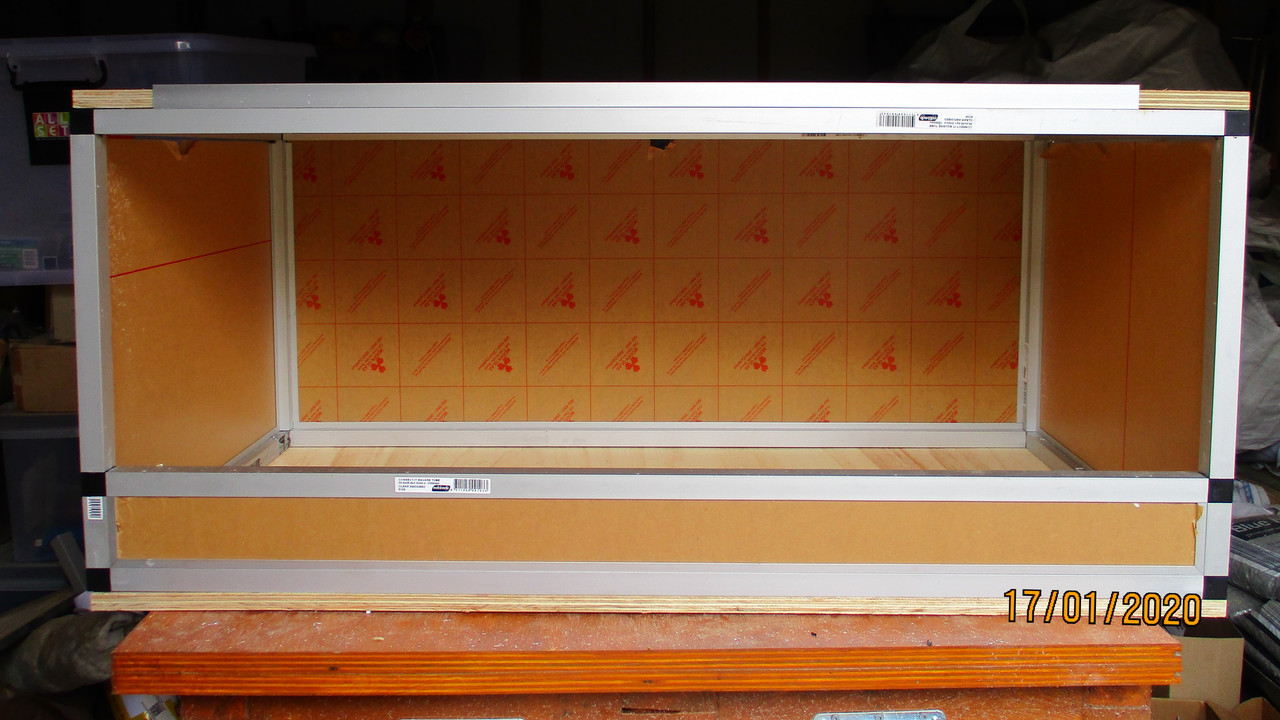
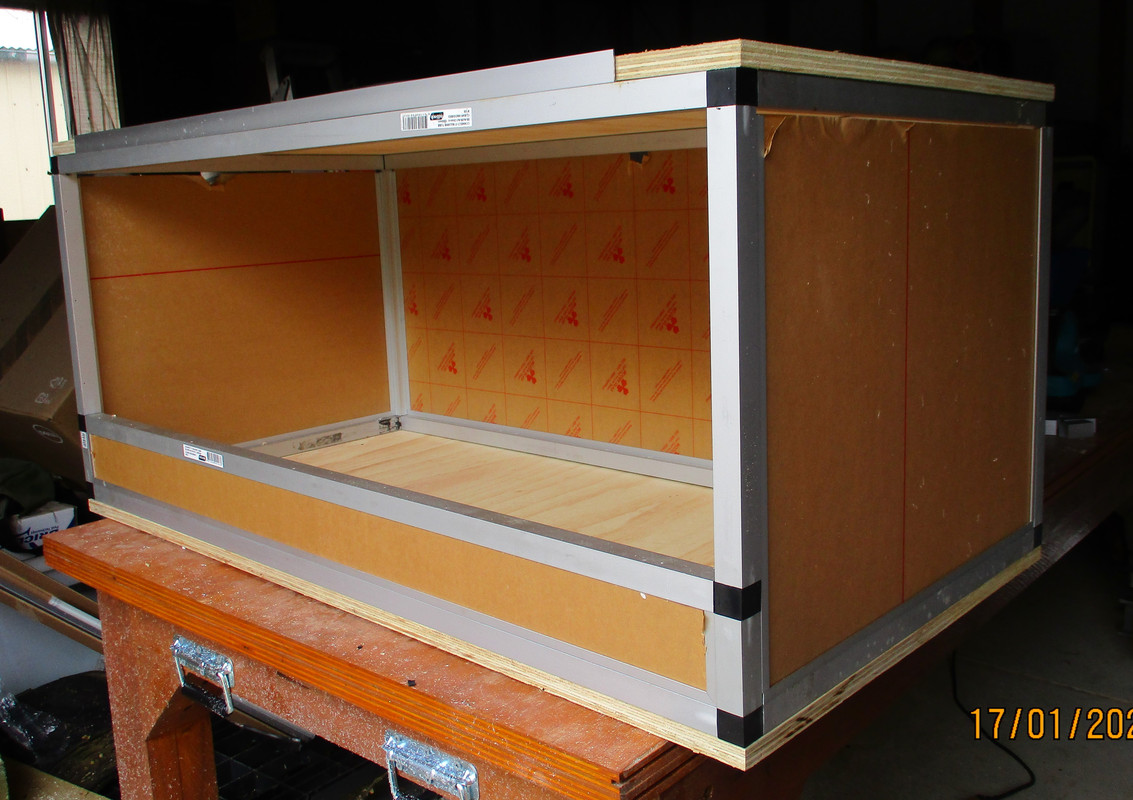
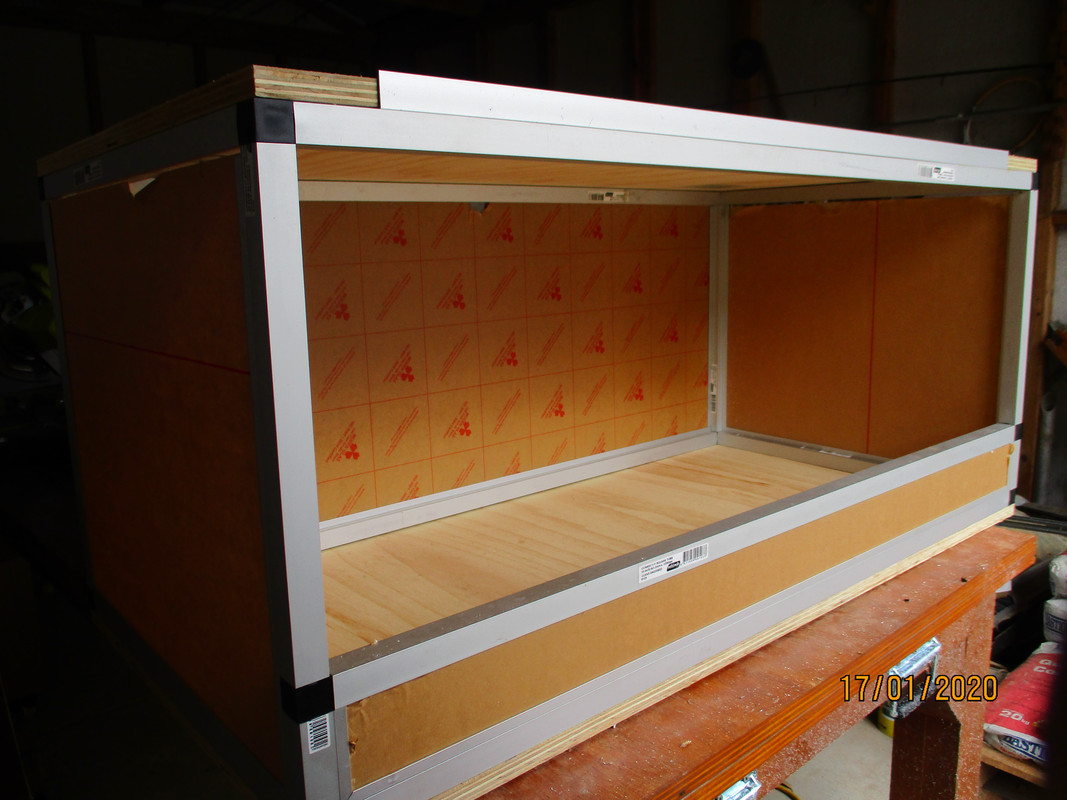
Nutting out options for modularization of my beardie and water skink tanks.

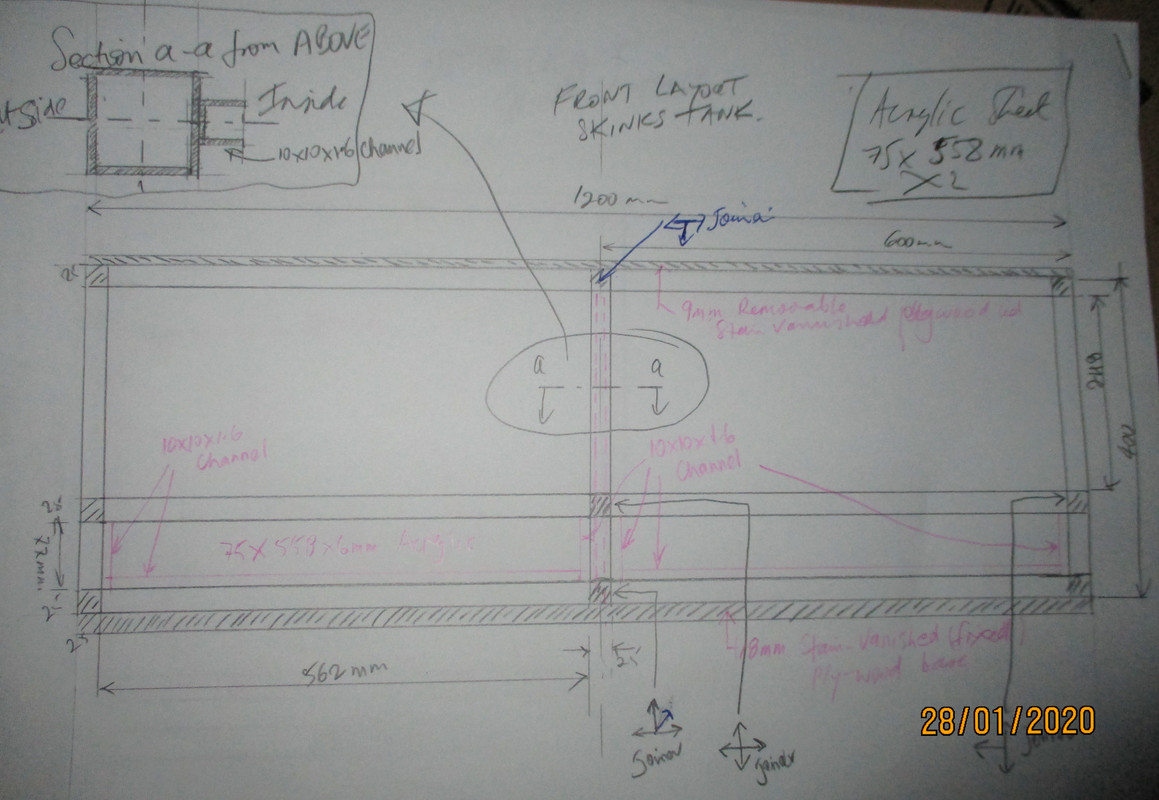
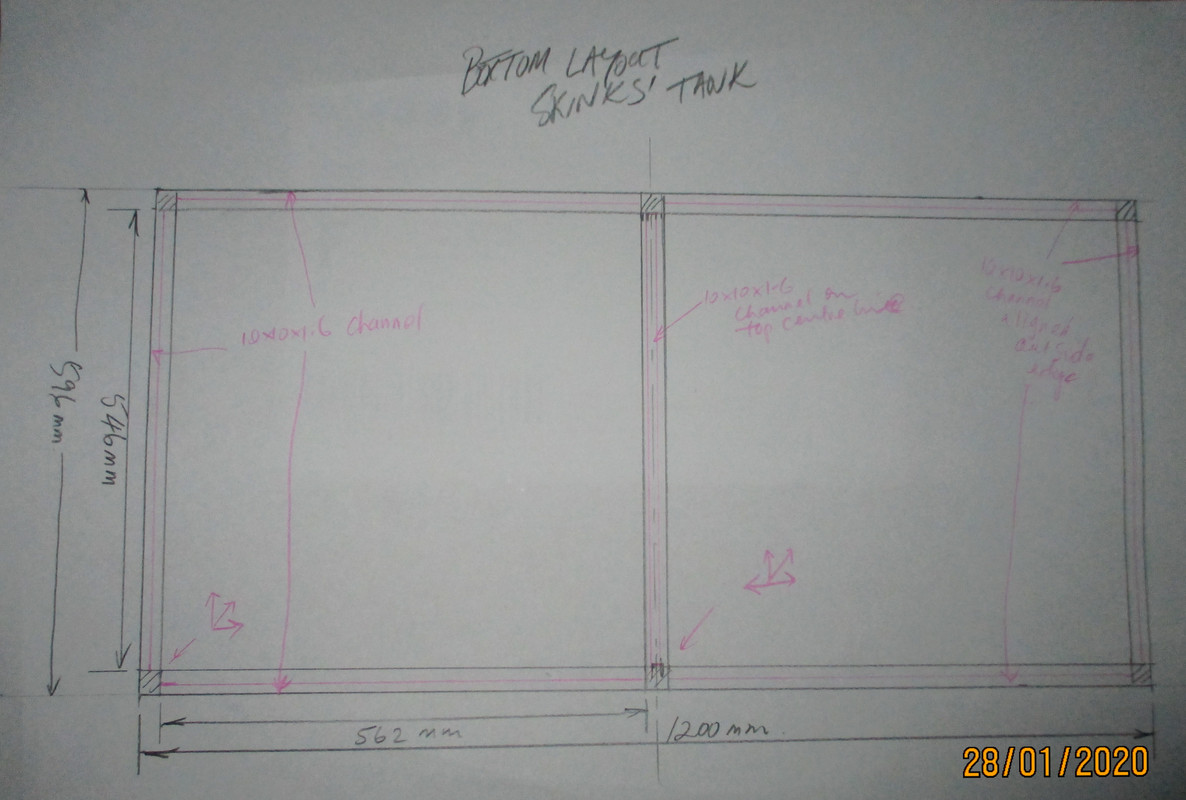
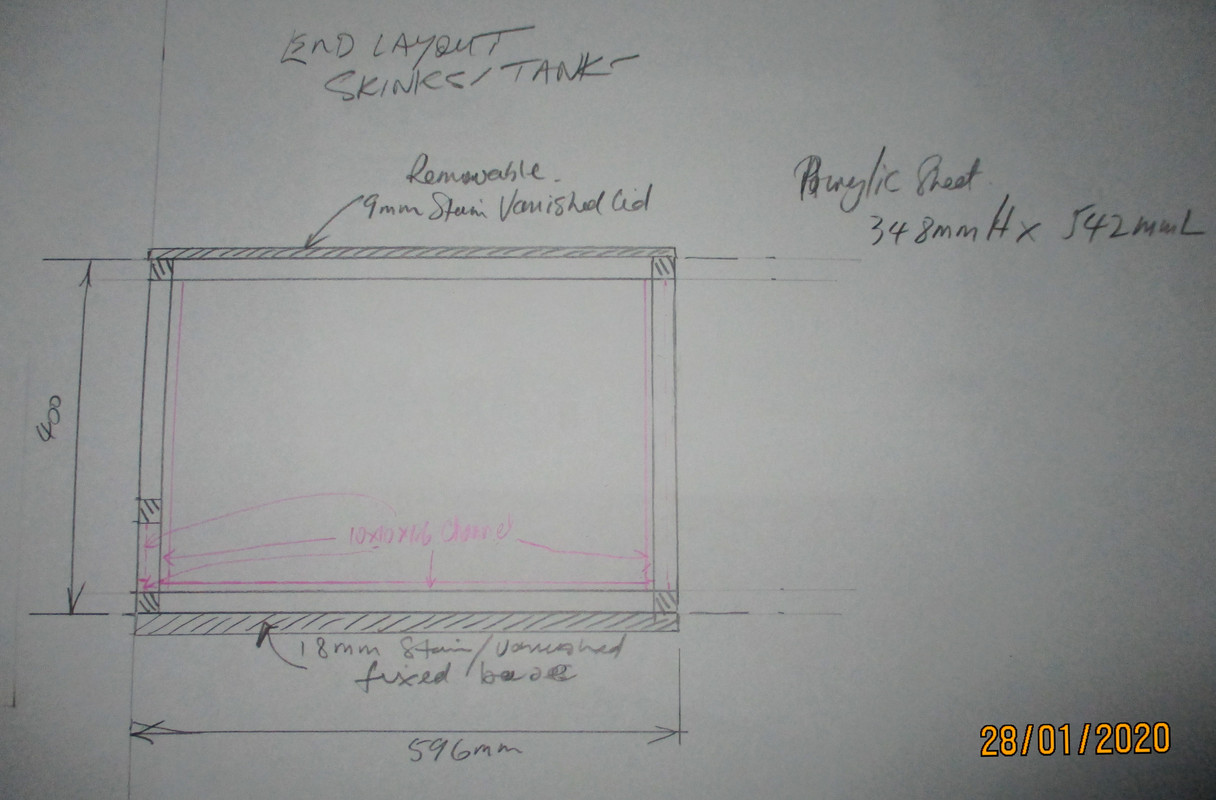
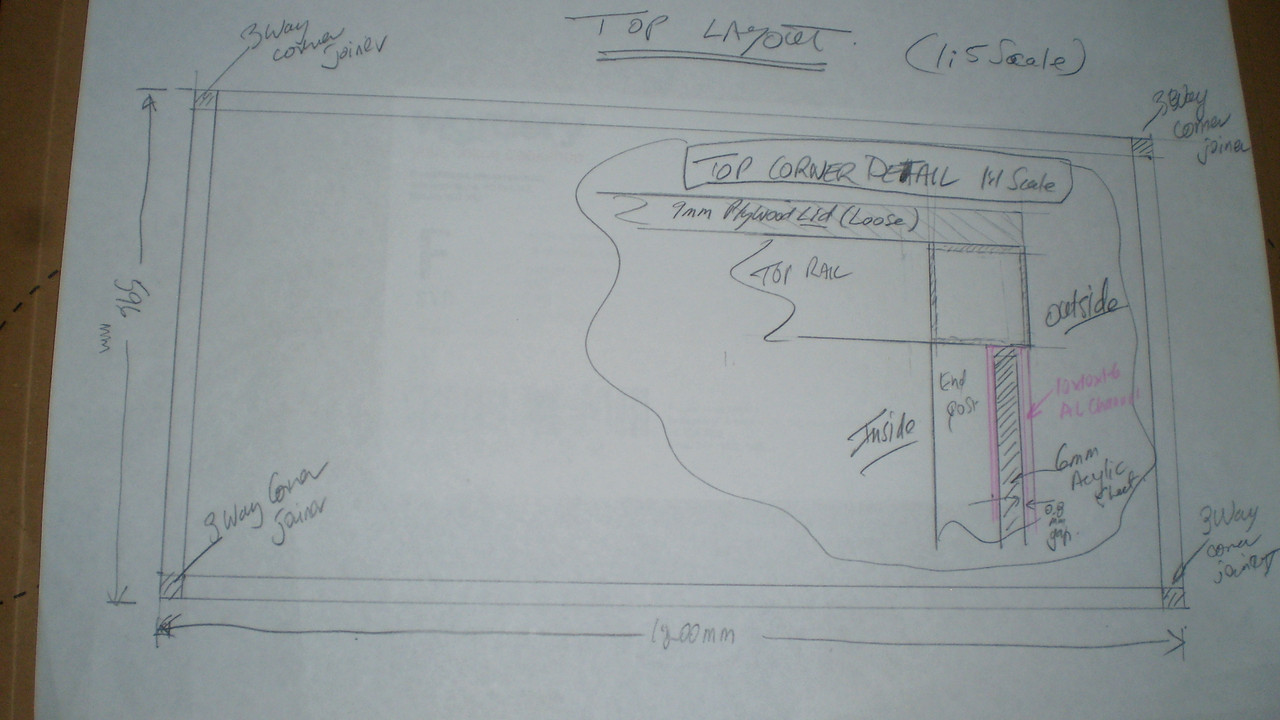
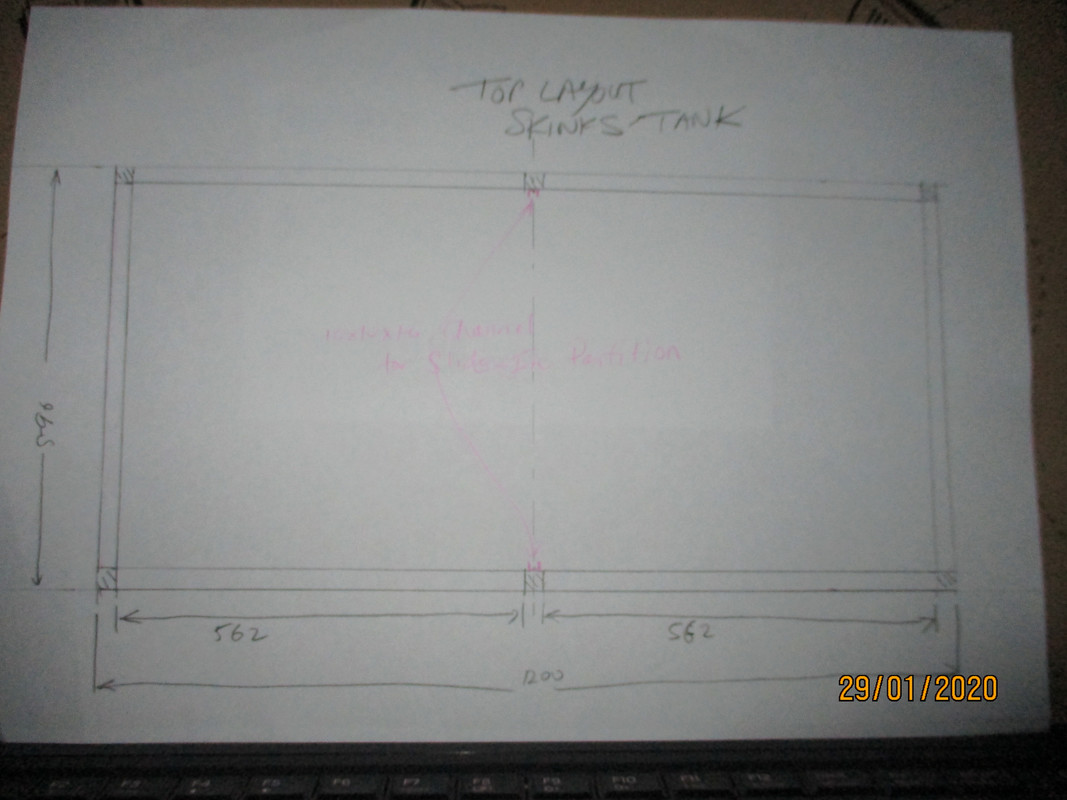
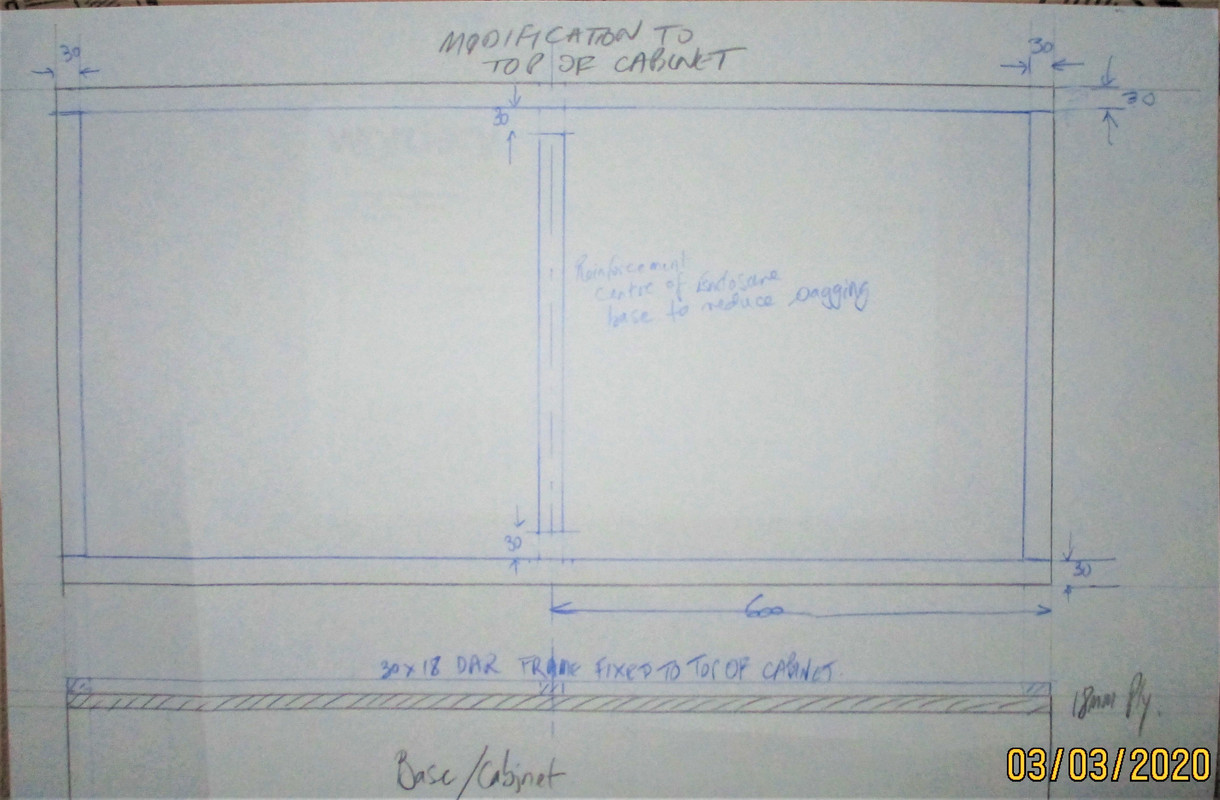
Will be 2x 1200mm L x 596mm W x 450mm H ( for the dragons) and a convertible ( splitable ) 1200mm L x 596mm W x 300mm H ( as sidebyside 600mm L x 596mm W x 300mm H tanks ) .

Option 1
modular-tanks-option-1.png

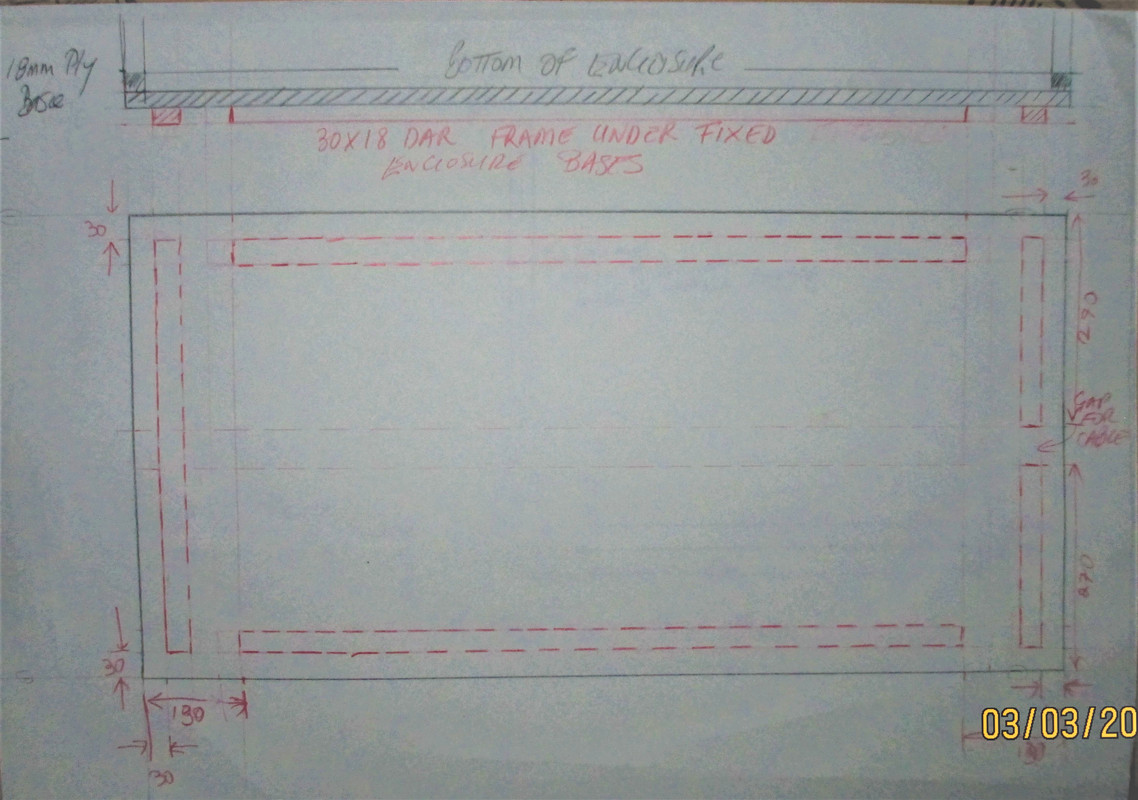
No air gap between stacked modular tanks , overall height restricted to bare minimum.
Cabling and all light fittings inside the tanks.

Option 2
modular-tanks-option-2.png

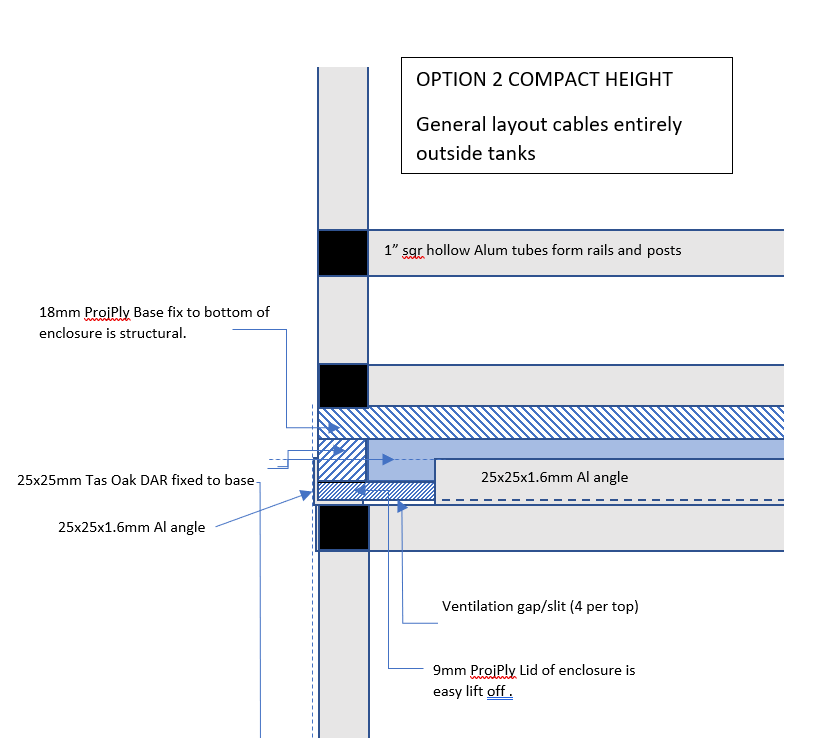
Minimal Height, with 1" airgap providing lid ventilation, cables external ( on top lid ).

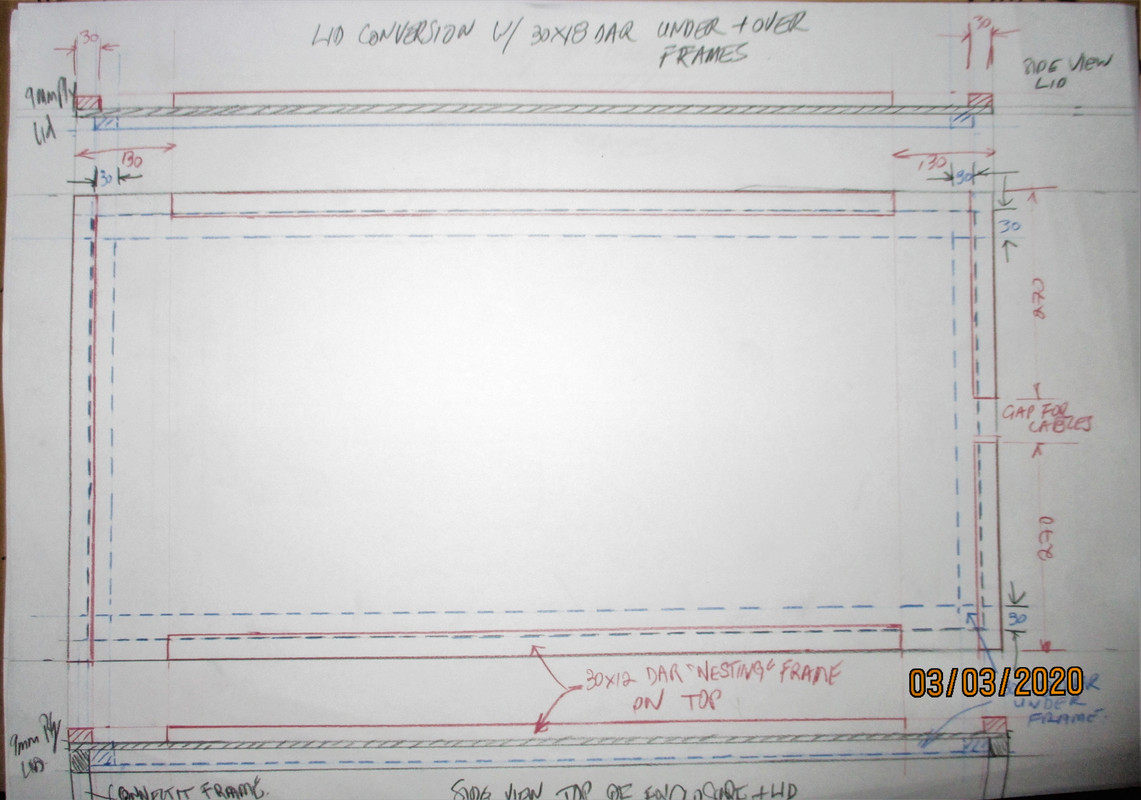
edit 17jan : Standard DAR size closest to 1" square is 30mm x 30mm , so my gap will be 30mm high minimum.

Option 3
modular-tanks-option-3.png

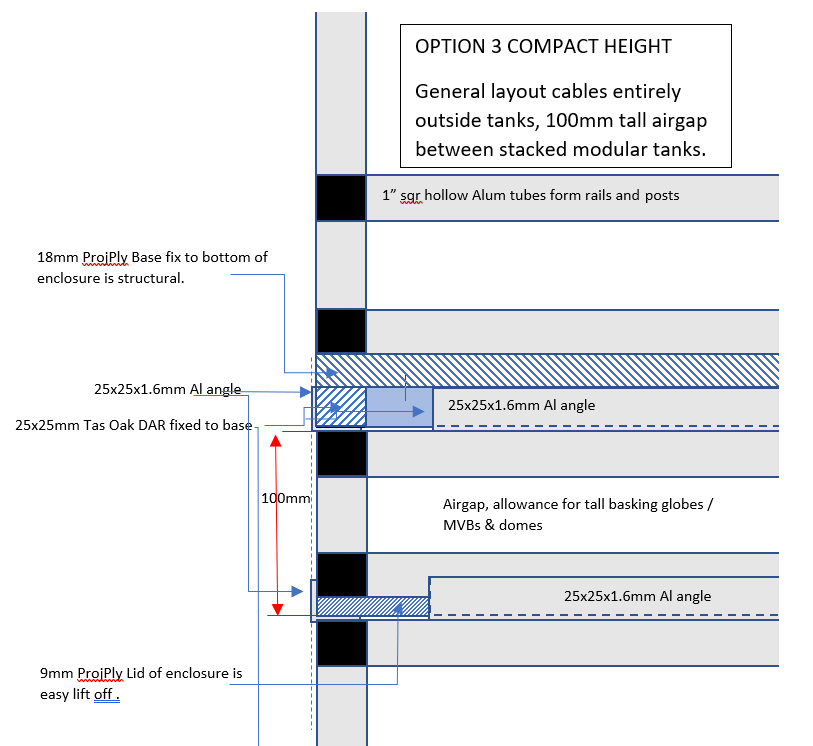
100mm airgap between tanks to make provision for tall basking globes.

The modular airgap can also serve a tank height extension of 100mm to make instantly change from 450mm tall to 550mm tall in a few minutes. .

Procedure for 100mm and 200mm tank height extension :
1) lift off the 9mm lid that supports the lighting and cables.
2) install 6mm thick acrylic panels of suitable size on the inside of the prepared 100mm

enclosure-height-extension.png


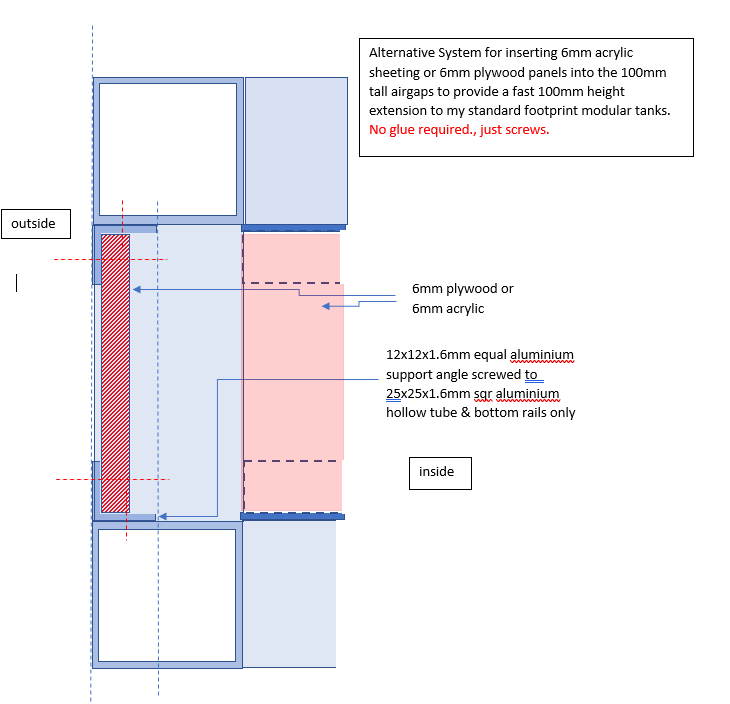
airgap/spacing frame ( 12x12x1.6mm Aluminium angle will screw in place to support 6mm thick panels of clear acrylic or 6mm thick plywood panels.
3) deposit the prepared 100mm extender / airgap.
4) repeat 3 if a 200mm extension in height is required.
5) deposit the lid ontop.
Very simple to build once all the pieces are cut to size.

Not many enclosures available have these easy conversions builtin , and yes I'm likely to apply for a patent for my idea.
 

kingofnobbys

BD.org Sicko
Original Poster
Update .

Did and experiment with the 10x10x1.6mm Al channel, is fairly easy to bend the webs enough to have a snug fit to the 6mm thick acrylic , better than having a 0.8mm gap or risking using silastic to fill the gap (might react with the acrylic or corrode it on contact).

Booked my skilled handyman for the 17th to come and build my 2 prototype enclosures & and maybe a third set up as a convertible split 1.2m L x 0.596m D x 0.4m T set up as twin side-by-side 0.6m L x 0.596m D x 0.4m T tanks for my eastern water skink colony .

The 18mm thick plywood bases and 9mm thick plywood lids , and the cabinetbase that were all vanish stained just before Xmas should have all thoroughly set and dried by then.

Ordered in some more 6mm acrylic cut to the correct size for the sides ( enough to build at least 4 enclosures ) is cheaper than getting the handyman to muck about cutting the acrylic with his table saw and trimming it with his router - tells me he's never worked with acrylic before. This means he'll not have to try cut nice small long straight cuts in the old sheets I had set aside for an all acrylic project ( some 5ft x 4ft ) and he'll only have to shorten the 75mm pieces and the two big back pieces - this will save a LOT of time.

My 2G x 6.5m and 4G x 6.5mm CSK PHIL HD S/TAPPING SS screws are here .

2G screws will be handy to fix the 6mm acrylic tops to 12x12x1.6mm Al angles if this proves needed, will likely do this on the top of the sides , back and 75mm acrylic panels to add rigidity.

4G screws will be used to fix the 10x10x1.6mm Al channels to the 1"x1" hollow Al square tubes ( head are 5mm OD so this works well and also to fix the Cowbrey plastic sliding glass door tracks.

The screws order included some 10G x 38mm Zn coated PHIL HD S/TAPPING screws with CSK heads suitable to fix the 18mm plywood bases to the enclosure frames (from under) , and also some with Pan heads that may be useful.

Like everything, it pays to order in bulk ( trade packs ) and have it sent to you by post or courier , so I have 400 of each size screw . Crazy expensive buying the screws in retail packs that might only have 20 screws in the pack and I didn't want Hossein wasting time at Bunnings trying to find suitable sized screws for my project.

Just need to order in some 12x12x1.6mm Al angle.

The router head for acylics , the specially sharpened acrylic drill set , and the circular saw blade recommended for plastics and soft metals have all arrived as well . I'll need these when I do the next enclosure build projects for my bluetongues etc .
 

kingofnobbys

BD.org Sicko
Original Poster
My first CONNECTIT & 1" SQR Aluminium Tube 1200mm L x 596mm D x 500mm H prototype bay as assembled today .
The sides and back are see-through 6mm acrylic. The protective film left on for now.

IMG-0032-prototype-front-ready-for-sliding-glass-door-installa.jpg


IMG-0033-prototype-right-end.jpg


IMG-0034-prototype-looking-in-from-left.jpg


IMG-0035-prototype-looking-at-right-end-not-small-air-and-expans.jpg


IMG-0036-prototype-back-end.jpg


Handyman Hossein chose to use the 2G x 6.5mm C/sunk s/tapping screws and as a result broke three 2mm drill bits trying drill into and through the 6060 grade aluminium channels & sqr hollow tubes ( wouldn't have thought a total thickness of 3.2mm would be so tough).
I'll be insisting he uses the 4G x 6.5mm C/sunk s/tapping screws next time , 4mm drill bits are harder to break than 2mm drill bits.

Ready to fix 18mm plywood (H2O based) exterior stain-varnished base to bottom .
And to add 25 x 25 x 1.6mm aluminium angles to top as seat for 9mm plywood (H2O based) exterior stain-varnish lid and as seat for second same "size" tank ,
and to install sliding glass front door tracks and glass doors,
and to install the T5ho Arcadia Slimline Luminaire w/ 24W 12%UVB T5ho tube & slow profile all ceramic e27 fitting and an Arcadia 80W MVB & basking globe cage under the 9mm plywood lid.

Then I can establish correct basking position height in preparation for furnishing the new beardie tank /s .

Handyman has never worked with acrylic before so I suspect his cuts are not 100% smooth but will be hidden out of sight inside the 10 x 10 x 1.6mm aluminium channels so no one will be any the wiser.
I'm hoping the aluminium tubing cleans up nice too.
Told him leave the prototype in the shed and leave the protective paper on the acrylic.

Says he'll be able to come back maybe next weekend to do the second tank and varnish - stain the bases and tops .

Given it took about a month for the Cabots' water based Baltic stain varnish to dry and harden properly , I think it's likely Caesar and Cleo wont get to move into their individual big forever homes til the end of February.
 

kingofnobbys

BD.org Sicko
Original Poster
Ready to return to my modular mix and match multibay dragon and skink enclosure .

Built the frame for the first of two prototype bearded dragon enclosures using aluminium 1" square hollow tubes connected using CONNECTIT joiners , and 10x10x1.6mm aluminium channel to slide the precut 6mm thick UV stabilized clear acrylic side , back and front panels into.
The building the second enclosure , will be identical , on Wednesday (?).

I'm opting for a 40cm tall tank for the 3 water skinks ( assuming Cheakie is found and recaptures after he get's his hornyness and wonder lust out of his system , yes he's done it to me again and is on the loose again !! ) .

It'll designed so I can very easily and quickly partition one side from the other by lifting off the 9mm thick plywood lid , and sliding a 6mm thick panel of white acrylic or maybe some 6mm thick panel of plywood to separate my 2 adult females from my horny subadult male when I don't them to breed . My design is shown below :

skinks-tank-prototype-front-layout.jpg

front

skinks-tank-prototype-back-layout-ignore-lense-distortion.jpg

back

skinks-tank-prototype-bottom-layout-ignore-lense-distortion.jpg

bottom

skinks-tank-prototype-side-layout.jpg

side

layout-for-top-of-1200-L-x-596-W-x-450-H-tank-w-detals-27dec201.jpg

top (showing how channel fits the 6mm acrylic

IMG-0087.jpg

top in general

The adjustable tank will is also good design for baby and juvenile BTS , PTS , knobtail skinks, etc being two side by side 600mm L x 596mm D x 400mm T tanks that can be converted a single 1200mm x 596mm D x 400mm T tank in about 1 minute.

I did consider doing something similar to that American company who sell similarly constructed tanks wrt using double sided adhesive tape to hold skinny under doors kickboard in place but I don't that's a satisfactory solution (even if it looks tidier, being invisible and not obvious).

I also considered going with a 30cm to 35cm tall tank , but think that's too restrictive on the climbing options and brings the basking light too close to the skinks.
I think 35cm tall is the minimum practical tank height but only if using a very compact GU10 Halogen or Dichrotic basking globe ( these are tiny compared with MVBs , incandescent or halogen flood globes ).

Comments welcome.
 

kingofnobbys

BD.org Sicko
Original Poster
Prototype Nesting Frames
To make stocked modular enclosures secure , simply made from 30x30mm DAR so the 18mm bases fit the frames for the 9mm lids.
A couple mm gap between is probably enough to stop the inner frame from binding on the outer frame .

Same 30x30 DAR frame size will be on the top of lids and on the top of the cabinet base.
The 30x30 DAR frame on the bottom of the bases will drop inside the 30x30 DAR frame on either the top of a lid or the cabinet-base's top.
 

kingofnobbys

BD.org Sicko
Original Poster
Been too wet and stormy lately , using extension cables on wet ground and in wet conditions is DANGEROUS even if there are earth leakage CBs in the fusebox , and the week or two before that it was way too hot to work outside in the sun ( mid 40s degC ) .
More pleasant weather ( more typical February conditions ) now , just overcast , mid 20s to low 30s degC and the rain seems to have gone , so I've booked Hossein the Handyman for Tuesday , here's hoping the rain continues to stay away for the day.

He'll be vanish-staining 3 panels of 18mm ply and 3 panels of 9mm ply and building bearded dragon tank No.2.
If he has time I'll get him to start the convertible split water skink tank , or at least attach channeling to the 1"x1" sqr hollow tubes so I can simply assemble the enclosure when I'm ready for it ( ie if Cheakie comes back inside & we can get him back into a tub, or I am able to locate another male from a breeder).

Once he's got the ply panels stain-varnished , I'll give them a couple of weeks dry before attaching my light fittings for the MVBs and T5ho 12%UVB tubes to the 9mm ply lids.
 

kingofnobbys

BD.org Sicko
Original Poster
Connecting the mix and match CONNECTIT system enclosures to the cabinet-base and to each other .

Decided to use 30x18mm Tasmanian Oak DAR framing rather than 25mm aluminium angle , will look nicer when vanish/stained than anodized or mill surface finish aluminium and is more inside my handyguy's comfort zone than dealing with aluminium ==> faster job. This is a modification of OPTION 2.

Modificatication of top of cabinet = add a 30x18mm DAR nesting frame.
connecting-cabinet-to-base-of-enclosure-using-30x18-DAR-framing.jpg


Modification of 9mm thick plywood lid is a little more complicated , need a 30x18mm DAR nesting UNDERFRAME to sit inside the top of the 25mm sqr tube framing for the enclosures and a 30x18mm DAR nesting OVERFRAME to sit the base frames inside.
Need to provide sufficient airgap to allow cables to sit on top the lid and access for the cables into the airgap and to provide some through lid ventilation.
lid-modification-to-drop-securely-inside-top-of-enclosure-and-ne.jpg


Modification to 18mm thick plywood base is simpler , but the 30x18mm DAR nesting insert frame still needs to sufficient airgap to allow cables to sit on top the lid and access for the cables into the airgap and to provide some through lid ventilation.
modification-of-base-to-provide-secure-lift-off-drop-in-nesting.jpg
 

kingofnobbys

BD.org Sicko
Original Poster
Will have to wait for 2 months, Hossein's wife is an undergraduate nursing degree student and will be doing her 5 week final practicum at JHH until end of April.
So he's forced to stay home to look after their 2 little kiddies while she's "working".
I don't want him back until her practicum has been over for at least 4 weeks , in case she picks up covid19 at the hospital and brings it home.
There are covid 19 patients in JHH now, and some people locally who came off "that" cruise ship and through Sydney Airport in those cockups. Hossein is (last time I spoke to him) still working nights as a Uber driver ( a high risk occupation ), I'm hoping he's changed jobs to delivery driver instead by now..

Better safe than sorry IMO , while I appreciate he's keen to come back to do some more work for me in the meantime , I'm not prepared to run kind of risk personally for my wife and I even if he stays outside and keeps at least 2m away from us.

Only need the nesting frames cut and fixed to the bases and lids of the tanks, the replacement lids vanish-stained ( the ones he did before were vanished on side only and bowed too much to be useable , vanishing otherside 2 weeks later didn't fix the problem ) , the nesting frame on top the cabinet , and then I'll install the sliding door tracks and lights.
 
Status
Not open for further replies.

Members online

Still Needs Help

Latest resources

Latest posts

Latest profile posts

Getting ready for another day. Feeling sleepy. 😴
I just walked into my room and instead of looking at me, Swordtail's eyes darted directly to the ice cream drumstick I'm holding
Finally replaced Swordtail's substrate
I miss you so much, Amaris 💔
What is a quick way to warm up a cold beardie? His heating element went out overnight and now he's very cold.

Forum statistics

Threads
156,045
Messages
1,257,125
Members
76,044
Latest member
SunshineP95
Top Bottom